
PeerTube is a unique YouTube alternative that decentralizes video hosting across numerous servers. I will show you how to smoothly navigate PeerTube with 3 different software tools: NewPipe, Thunderbird, and Mastodon.
Plus, to help you get started, I will share my list of 260 top channels: https://nx67498.your-storageshare.de/s/etBkd4q5q4zjieK
How to Use NewPipe to Watch PeerTube
If you’re exploring PeerTube and looking for user-friendly software to enhance your viewing experience, NewPipe is my top recommendation. It can be installed on any Android device, including smart TVs, making it a convenient choice for all users.
Setting Up NewPipe
Once you’ve installed NewPipe on your device, open it up. By default, NewPipe is set to YouTube. You’ll need to switch it to PeerTube. Start by clicking the burger menu in the top left corner.

Then click the NewPipe button.
Here, you’ll find the option to switch to PeerTube by clicking on the PeerTube icon, which is set to FramaTube by default. I’ll explain what FramaTube is a bit later.
Navigating NewPipe
The main interface of NewPipe includes several tabs. We’ll start with the ‘Subscriptions’ tab.

Initially, this will be empty, but don’t worry – I’ve got you covered. You can import 75 channels I recommend by downloading the JSON file linked in my video description. Simply click the three dots in the top right corner.
Newpipe – Download my 75 Channels

Choose ‘Import from’, and then select ‘Previous Export’.

Locate the file and import it.

And voila! All my favorite channels are now yours.

Staying up to date with New Content
One of the features of NewPipe that you’ll find incredibly useful on a daily basis is the ‘What’s New’ tab. It provides the latest content from all the channels you follow. You can click on the ‘Refresh’ button every couple of days to make sure your feed is constantly updated with fresh videos. That way, you will get a regular dose of new and exciting content that keeps you connected to your favorite creators.
Adding New Instances and Channels to NewPipe
Next, let’s explore a simple way to subscribe to new channels and broaden your PeerTube horizon. Again, use the burger button in the top left corner of the page.

Go to ‘Settings’.

Then go to ‘Content’.

Finally, go to ‘PeerTube Instances’.

In NewPipe, the term ‘instance’ refers to a server. For example, we’re currently using the FramaTube instance. That’s the default server you saw when we first opened the app. Each instance hosts its unique set of channels and videos.
You can add a new instance by clicking the Plus button.

For example, let’s add ’tilvids.com’. TILvids has some of the best content in the PeerTube universe.

Confirm by clicking OK, then click on the radio button to activate it.

Return to the main screen. Now, you can browse the trending videos on TILvids. Remember, ‘trending’ might not always include the newest uploads. To catch up with the latest videos, just click on the burger button again. Select ‘Local’ to view recent uploads.
How to subscribe to a PeerTube channel with NewPipe
If you find a video you like and want to subscribe to the channel, simply click on the video and then go to the channel.

Hit the Subscribe button and you’re done!

How to Use Thunderbird to Watch PeerTube
Another excellent way to enjoy PeerTube videos is through Thunderbird. It’s a great tool that allows you to subscribe to the RSS feeds of your favorite channels.
Creating a New Account in Thunderbird
Begin by installing Thunderbird on your device. Once set up, click on the burger menu and select ‘New Account’.

Then select ‘Feed’ and create a new account name.

Let’s use ‘PeerTube videos’ for example. After you click ‘Next’ and then ‘Finish’, your account is ready to go!

An example of creating an account name.
Importing My Top 75 PeerTube channels to Thunderbird
Now, to populate your account with channels, right-click on the ‘PeerTube Videos’.

Select Subscribe.

Click on ‘Import’, then locate and select the OPML file I’ve provided in the video description. Click ‘Open’.
Thunderbird – Download my 75 Channels

In just a few moments, the list of my favorite channels will appear in your account. Close the window, and just like that, you have access to my curated list of channels, ready to watch in Thunderbird.
Getting the Latest Videos

To refresh your feed and catch up on the latest videos, simply click on the account name and hit F5. This will update your list, showing you all the recent posts from your subscribed channels. If a video catches your eye, just click on its card, and the content will appear on the right side for easy viewing.
If the video doesn’t appear right away, you can easily fix this by clicking on the ‘More’ dropdown and display the message body as a web page.


And here it is! Now you can watch the video directly inside Thunderbird.
Adding New PeerTube Channels to Thunderbird
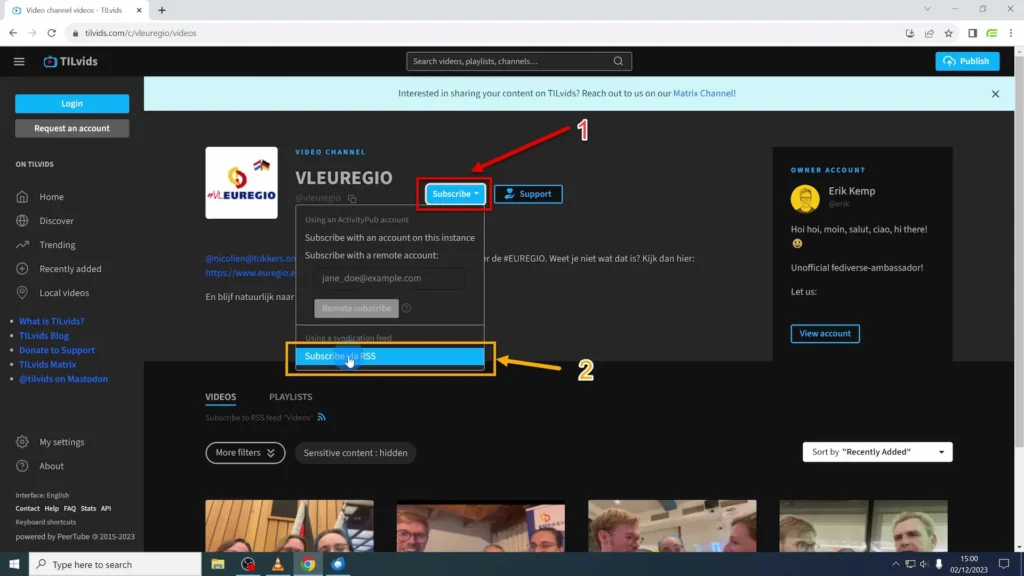
Next, let me guide you through adding a new PeerTube channel to your list. For instance, if you find a channel you like on TILvids, simply click the ‘Subscribe’ button, and then choose ‘Subscribe via RSS’.
Copy the URL from the XML file.

Then, head back to Thunderbird. Right-click on the account name, and select ‘Subscribe’ to add your new channel.

Simply paste the URL into the feed URL, then click ‘Add.’ Close the window, and that’s it -you’re all set!

How to Use Mastodon to Watch PeerTube
Mastodon isn’t just for social networking; it’s also a fantastic platform for watching and interacting with PeerTube videos. Start by creating an account on any Mastodon instance.
Subscribing to a PeerTube Channel on Mastodon
Once you’re logged in, navigating to your favorite PeerTube channel is simple. Let’s use tilvids.com again as an example. Go to the channel you like and hit the ‘Subscribe’ button.

To subscribe, you’ll need to use your Mastodon handle. You can find this by clicking on your name in the top right corner of Mastodon and copying it from your profile.

Back on the PeerTube channel, paste your handle into the ‘Subscribe with a Remote Account’ field and click ‘Remote Subscribe’.

After clicking ‘Remote Subscribe’, wait for a moment and then confirm the subscription by clicking ‘Follow’ in Mastodon. Every time the channel posts a new video, you’ll see an update in your Mastodon feed, keeping you connected with the latest content.

Engaging with the Content on Mastodon
One of the best features of using PeerTube with Mastodon is the ability to engage directly with video content. Unlike other apps I’ve shown you, Mastodon allows you to comment on videos. Simply click on ‘Reply’ under a video to leave your comment. Mastodon makes your viewing experience interactive and social.

In Conclusion
Each of these platforms has its own unique advantages. Whether you prefer the simplicity of NewPipe, the integration of Thunderbird, or the interactive community features of Mastodon, I am sure one of these tools will suit your needs for engaging with decentralized video content.
Thank you for following along and I hope this tutorial helps!